The Art of Measuring, Fabricating and Installing Storefront
 |
| CRL-U.S. Aluminum IT451 thermal storefront system with Series 400-T thermal entrance doors. Photo by Derek Lepper. |
Storefront systems can drastically enhance commercial and retail environments by improving brand identity and visibility for various types of businesses. They provide architects, specifiers and glazing contractors with shorter lead times without sacrificing customization, quality or reliability. While storefronts present themselves as economically viable options, they meet and exceed high performance and operation standards when properly measured, fabricated and installed.
The foundation
A durable storefront system starts with well-designed sill and sill flashing components that protect the storefront from the damaging effects of air and water infiltration. The sill profile should always have a full-depth pocket that can directly attach to the substrate. The sill flashing should possess a full height leg on the storefront’s interior, complete with a silicone sealant-filled cap bead that blocks unwanted weather elements. Be wary of a sill flashing system that isn’t full height or doesn’t have a retaining leg as this will cause blind seals to form due to the fastener penetrating the sill flashing after installation.
Measurements
First and foremost, it is important to take precise measurements of the entrance’s masonry opening. Start by measuring the net frame height to determine if the opening is level, and to find the highest point of the elevation. Then, carefully re-measure the opening’s height across several locations; remember, the height of the installed storefront’s frame should equal the shortest dimensions of the opening, minus 5/8 inch. After you’ve noted the appropriate height for your storefront frame, measure the width of the rough opening at the top, middle and bottom. The sill flashing (bottom) length should equal the shortest dimension measured, minus ½ inch. When installing storefronts, 3/8-inch to ½-inch joints are most commonly used throughout the industry and are recommended by most sealant manufacturers.
Once you have all of your measurements and begin to fabricate and install your storefront, all work on the system should begin at the bench marks and/or column center lines noted by the general contractor. Always make sure that the storefront components are installed plumb, level and true, in compliance with the manufacturer’s installation instructions, contract and construction documents.
Fabrication
There are two common fabrication and erection methods for installing storefront systems, including the screw spline and shear block methods. Both methods allow glazing contractors to conveniently preassemble single units in their shop environment or at the job site.
The screw spline method utilizes mating mullions during the fabrication process to attach sidelite horizontal glass stops with screw spline door jambs. Horizontal glass stops should be cut for daylight openings below 1/32 inch, while vertical door jambs should be cut longer because they run all the way from the top of the storefront to the floor. When assembling screws on vertical members, use drill jigs to drill holes.
Once all material is cut, the sill, head and horizontal members must be buttered (bead of caulking on the raw edge of the profile) at the edges before assembling the storefront. This, along with installing water diverters at the intersection of the vertical jamb to the horizontal members, and adding end dams to the sill flashing, will prevent water infiltration when the storefront is sealed and installed.
Shear block storefront systems, also known as can systems, use shear blocks to assemble storefront units at the top openings of sill flashings. Typically, once shear block systems are assembled, they are stacked in place at the job site. With this method, all end dams must be buttered on the head and sill cans to ensure protection against water infiltration. Be sure that the horizontal locations are caulked at the shear block locations to ensure a water tight seal, which will essentially block water from penetrating the substrates and leaking into the building.
Pre-installation
Before you begin to install a storefront, it’s important that the construction complies with the contract documents and architectural drawings. Notify the general contractor in writing of any discrepancies and resolve any construction issues before starting the installation process. This is key!
There are a few things to keep in mind before installation. For example, any aluminum storefront that will be placed in direct contact with uncured masonry or incompatible materials should be isolated with a heavy coat of zinc chromate or bituminous paint before installation. Without the proper sealing, the storefront will be susceptible to heavy air and water infiltration. It’s important that you make sure all sealants used are compatible with each component of the storefront, including other sealant surfaces. If you want to be absolutely sure, consult with the sealant manufacturer for recommendations for the application’s joint size, shelf life, chemical compatibility, cleaning/priming, tooling, adhesion and maintenance.
Also remember that it is the glazing contractor’s responsibility to submit proper documentation from the sealant manufacturer certifying that the glass and glazing materials used in the storefront have been tested for compatibility and adhesion with glazing sealants. This must also include test results with information on material performance as well as recommendations for primers and substrate application that will obtaindesired adhesion.
Installation
 |
 |
Finally, the moment of truth.
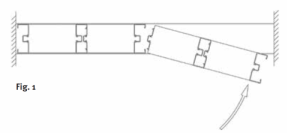
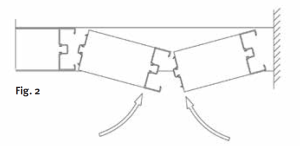
Now that the storefront units are ready to go, carefully install the system’s starter frames (Fig. 1). Once that is complete, the adjacent frames should be snapped together until the last two remaining frames of the storefront are left, at which point they should be installed in opposite directions (Fig. 2).
Now you can fasten the storefront. Fastening essentially involves any method used to secure units to each other or to adjacent system components. Due to various substrates that the framing might be attached to, structural perimeter anchor fasteners are not specified in most manufacturers’ instructions. For structural perimeter fasteners, it is best to reference the shop drawings, structural anchor charts and/or consult with the fastener supplier to determine which anchors will work best for your storefront application.
Next, tackle the installation of the expansion joints and perimeter seals. Detailed instructions and special formulas for calculating expansion joints and other special criteria are included in the manufacturer’s installation instructions. Typically, expansion joints are required every 15 feet to 20 feet. Each part of the country has its own regulations for storefront systems, but usually regions with hotter climates have greater allowances for how much the storefront can expand.
Before you reach the final steps, it is important that you clean and protect your storefront system to ensure smooth operation and striking aesthetics long after installation. Aluminum surfaces that are exposed to the open elements should always be cleaned in accordance with AAMA publications 609.1 for anodized aluminum, and 610.1 standards for applied painted coatings (liquid or powder). Be careful not to use any chemical or construction cleaners until the project is complete and turned over to the client. Many perfect storefront installations have been ruined by an acid wash that destroyed the anodized finish. For good measure, always notify the general contractor in advance of the importance of protecting the storefront.
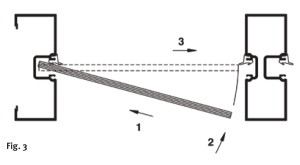
Now it’s time to install the glass! Always follow the manufacturer’s instructions when calculating glass sizes for the storefront, as they could vary from ¾ inch to 1 inch over daylight openings. Once you have the proper lites of glass, it should be flush-glazed into the opening with the anti-walk blocks installed immediately after (Fig. 3).
The last step in a storefront installation is the vinyl. All vertical and horizontal vinyl components should always be applied individually with vinyl rollers and then compressed with an additional inch of vinyl material. This will prevent the vinyl from shrinking, which can cause air and water leakage in addition to poor aesthetics.
Last-minute reminders
Proper sealing techniques are critical to the successful installation and long-term performance of a storefront system. There should always be a minimum 3/8-inch to ½-inch gap at the perimeter of the storefront frame to allow the sealant to contract and expand for different weather conditions. A backer rod should be applied around the perimeter of the frame that is topped off with a high grade sealant. Do not seal the joint between the sill and the sill flashing.
As always, consult the sealant manufacturer for recommendations regarding primers for the different substrates involved. Have the sealant supplier perform a field pull test to ensure strong adhesion to the storefront and adjacent substrates.
At this point, a significant portion of the storefront framing has been installed, glazed and sealed. It is recommended that an AAMA 501.2 Field Water Hose Test be conducted to ensure proper protection from water infiltration. For large-scale projects, this test should be repeated as deemed necessary by job and environment conditions, and acceptable quality control standards.
Paying close attention to installation instructions, contract and construction documents, and taking it step-by-step will result in a beautiful, long-lasting storefront system. However, failing to adhere to the critical instructions of the installation process can result in significant damage, costly repairs and a disappointed client.